1. Inventory
 |
| sample Kit Box with fully packed content |
a. Open your kit box in
your work station ideally with the table clear from other ongoing
projects. This should be opened
carefully as loose pieces or literature in the box may fall out and get lost.
b. Examine the individually
packed contents noting the removal sequence of the plastic packs. This has more
to do with your ease later on of putting back all these parts in the box every
after build session. Manufacturers usually manages to fit a lot of plastic into
a small box and you’ll be surprised that you can’t put it all back in the box
if stuff it all back haphazardly. The bottom-line is these parts may get lost,
disfigured or broken if not stored back properly every time.
c. Examine all the parts in
the sprues, decals and other items one at time as you might send the kit back
for replacement with a discovery of badly deformed, broken, missing parts or
poorly printed or missing decals.
d. Review the instruction
sheet or booklet. These will have a list
or diagram on what should be in the box. This should be checked against actual
box content as soon as you purchase the kit as it may be difficult to have a
faulty or incomplete kit replaced if it has been with you for a long time.
2. General Planning.
 |
| sample Accurate Armour scale models kit supplied with full building and finishing instructions |
a. Go over the
instructions, the box illustrations and your own reference images and have for
yourself a mental picture on how the model kit would look like once completed.
I believe the best initial blueprint of your build is how you would like the
kit look like in your mental eye.
b. Ideally and with a
simpler kit, it is best to follow the manufacturer's instructions based on the
manual inside the box. With more complex
kits and a more experienced modeler, one can always deviate from the suggested
steps. Build sequence deviation maybe
due to several factors such as painting considerations (some prefer to paint a
fully assembled kit or kit sections before full assembly, etc.), anticipation
of steps which can be independently done, leaving out smaller details
attachment (ammunition and ammunition boxes, lights, grab handles, etc.) near
the end to avoid the risk of them being broken off, etc.
c. Make notations on the
instructions itself as a personal guide on your preferred plan of action.
d. Mapping out your plan of
action may it be strictly based on the manufacturer’s instruction or with
preferred deviations will help you anticipate not only the steps but also
material you will need to proceed. It
can be special tools, additional decals to look for or printed, paint
materials, additional styrene rods, diorama materials, additional reference
materials, etc.. Doing so at the onset will save you a lot of build time.
3. Deciding on the Options
Take note of build options found
in the kit literature or based on your research or preference. Making these
choices now will help you identify early on any additional tools, parts,
materials, paints or even additional research needed, etc.
a.
decals or markings- alternate decals
indicating different vehicles in a unit.
 |
| tank paint schemes from Blitz72.com |
b. Paint schemes- which may
identify vehicles fought in different theatres of war for example, or the
racing team of a race car.
c. Presentation build
options- cockpit open or closed, aircraft undercarriage up or down, wing flaps
up or down, engine cowlings on or off. Etc.
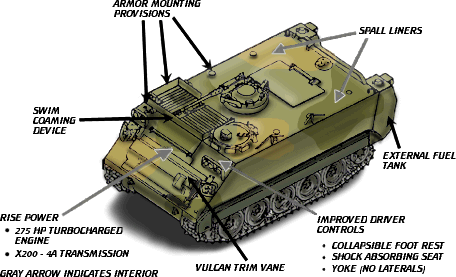 |
| M113A3 Armored Personnel Carrier from www.fas.org |
d. Vehicle version options-
alternate parts can spell the difference among versions of the same basic
vehicle type. A military tank for
example can be build as several versions of the same type (M113A1, A2 or A3 models, etc.) by
interchanging turrets, fuel tanks and other parts which will be complemented by
different paint schemes that goes with the version.
 |
| from modelcarsmag.com |
e. Out-of-the-Box options-
one can go out-of-the-box and NOT follow manufacturers’ options. It can be as
simple as using the kit itself as a “base” to build on whatever version you saw
in your research not necessarily based on the kit instructions only the success
of which is dependent of course on the modelers skill level. Aftermarket accessories can be sourced out to bring out the preferred version which can be as
simple as changing tank tracks or to go super-detailing by replacing parts with
those offered by after-market suppliers or even scratch built by the
modeler.
f. Display options. Your
plan on how to present your finished kits can be considered even in this
planning stage. This can be done as stand alone on a simple base or as part of
a diorama with figures, scenery, other models, etc.
4. Washing
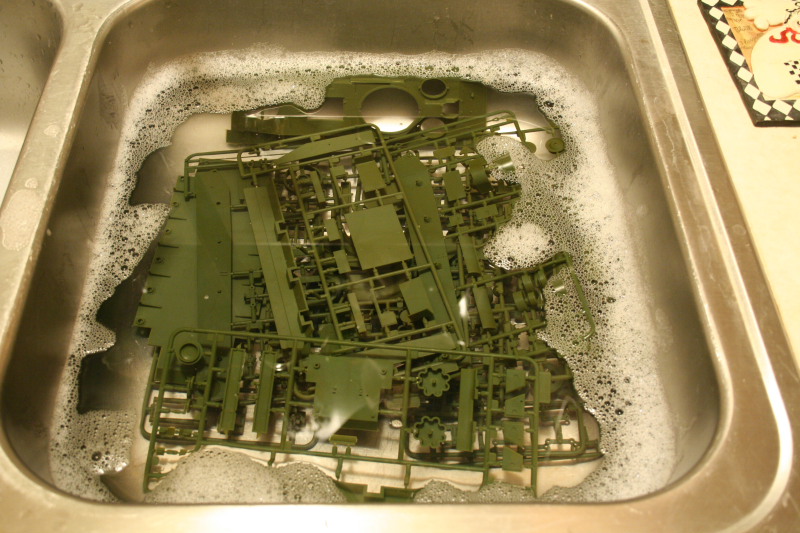 |
| from bpmodels.net |
a. This last step is done
just before starting the build. Parts straight from the box may be thinly
coated with chemicals used in removing the parts from the moulds during
production-same chemicals which can resist certain glues, fillers and paints if
not removed.
b. A simple wash can be
done using warm soapy water gently applied on each part with a soft brush,
rinsed well with clean warm water and then air dried.
c. Caution should be
applied with this simple procedure to assure that no parts will be lost (small
parts can easily break off with vigorous brushing!) and will literally go down
the drain during washing and rinsing. As
an added pre caution, I usually place over the sink drain those simple small
netted sink strainers which can catch these misplaced parts.
5. Start building! Enjoy!
NEXT:
PREVIOUS RELATED POSTS:
Tags: sprue , decals , styrene rods, styrene , diorama, aircraft undercarriage, aircraft, engine cowling, engine , cowling, M113A1, M113A1, Aftermarket accessories, Aftermarket
No comments:
Post a Comment